Kimonos are probably one of the easiest garments to knit on a machine because a pattern is not needed and there is no shaping. You can knit this on any knitting machine with the yarn of your choice!! I will explain how I knit my kimonos.
First, I recommend knitting a swatch with your chosen yarn and stitch pattern. After the swatch is off the machine, wash/finish the swatch how you plan to wash/finish your finished kimono. When the swatch is ready, you will then figure your gauge (the stitches per inch/cm), you can measure out how wide and long your fabric needs to be.
You will be knitting 2 separate rectangle/lengths of fabric which will then be seamed into the kimono. How wide does your fabric need to be and how many stitches do you cast on? The answers are easy. I measure from my neck edge to the elbow for my kimonos (which will be the width of one of your rectangle lengths of fabric). I like to have sleeves which come to about the elbow. If you want a shorter sleeve, measure from the neck to where you want the sleeve to end. I don’t think you will want a longer sleeve, but it is up to you.
You have your swatch and now know how many inches/cm wide you need your fabric (from your body measurement). Using your swatch, determine how many stitches to cast on.
Determine the length you want for your kimono by measuring from your shoulder down to where you want the bottom/hem to be. This number will be multiplied by 2 ( front length + back length = total length of the rectangle). Note: all photo directions below can be enlarged by clicking on the icon on the top right of the photo.
Now it is time to machine knit your kimono! Knit 2 rectangles of fabric in your chosen size/width/length. After knitting, finish your fabric- wash/dry/steam the fabric according to type/content.
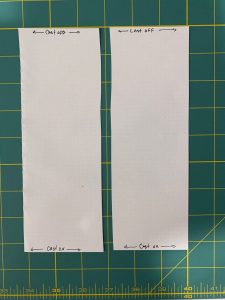
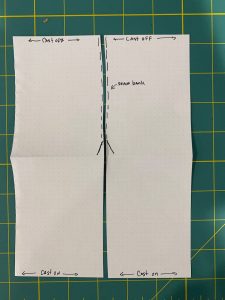
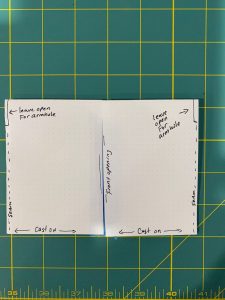
Lay the rectangles on the floor with the with the long sides butted together and short ends at the top/bottom. You will be seaming the back seam. I used clips and clipped the fabric together until about 5-7 inches from the center of the fabric. This center is the neck opening. Important: you want to be sure you clip/pin with the right/public sides of the fabric together. You will be sewing the back seam while looking at the wrong side of the fabric.
Try your kimono on after you have clipped/pinned the back seam to be sure you have placed the neck opening in the correct place. You may want to adjust how far you seam up the back. (If you have a dress form, you can drape your fabric on the form and clip/pin seams.). I started sewing at the bottom back hem and sewed up to the back neck opening.
You can sew the back seam in the method of your choice. Sew with right sides/public sides of fabric together. I have seamed kimonos with a linker and seamed with a sewing machine. You can use a straight stitch seam on the sewing machine because the seams requires no stretch.
If you are not confident sewing knits on your sewing machine, OJolly’s blog, Crafting Fashion, has lots of information for adjusting your machine. She also has classes for sewing knits.
Ok, so you have the back seam finished, now to sew the side seams. Fold the fabric in half. You will have the back seam down the middle (back) and on the front there will be an opening. The “fold” is the top of shoulders. The sides of this square of fabric is where you will create the arm holes. Clip/pin the side seams and leave about a 10″ opening for the arm hole. You can clip/pin your fabric and then try on your kimono.
After trying on your kimono, you may want to adjust the size of the armhole. (Important: Be sure you have your fabric right sides/public side together when you sew your seam. You will be looking at the back/wrong side of the fabric as you are sewing.). I sewed my seam from the bottom/hem to the arm hole opening.
Steam the seam towards the back of the fabric after sewing. When I sewed my side seams, I sewed in my brand label. I know a lot of people don’t use labels, but it is a great finishing touch even if you don’t sell your knits. 😉 There are many way to customize a kimono to your own pattern. Feel free to change up the pattern…

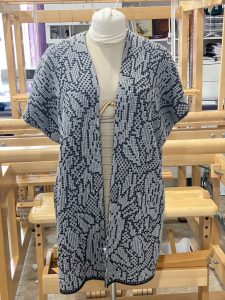
I will share the details on the two machine knit kimonos I have shown on this page. My neck to elbow measurement is 17″. I make my rectangle strips about 70″ long. The black and grey kimono was knit double bed on the Passap E6000 knitting machine. The yarn was mill end wool mix. The grey was more of a light UK 3 ply type yarn and the black was a mill end around 2/22 size. 56 stitches and 992 lock passes. Each knitted strip was 68 inches long after washing (before seaming). It is a heavy, winter type fabric.
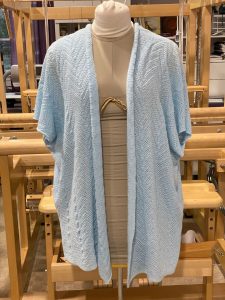
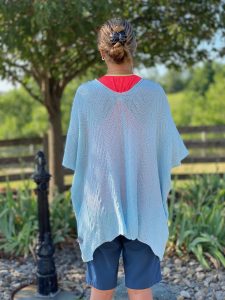
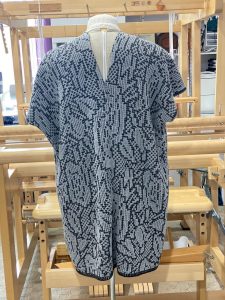
The sea blue kimono was knit in single bed tuck on Silver Reed SK840 standard gauge knitting machine. The yarn was 2/30 tension 7. It is a lightweight summer type fabric. (If you notice in the photo at the top of the post, you can see it is a bit sheer when I am wearing it.) I used Stitch Designer in Designaknit to add 4 plain knit/stockinette rows on the (long) sides of the fabric. I had 116 stitches and 750 rows for this kimono, as a result, each knitted strip was 70″ long after washing (before seaming). I would say both kimonos would be a medium/large size. I like to have a loose fit for kimonos
I hope these directions are helpful. There are so many ways you can take this pattern and modify it. You can use the stitch pattern to highlight specific areas on the kimono or you could change up the outside edges by adding a half Milano edge, therefore leaving the bottom hem open in a slit (for single bed this would be very nice!).
Passap Machine Knit Kimono - Herman Hills Farm
[…] knit another kimono on the Passap knitting machine. This was knit using my pattern I described on this post. Passap technique 186 double bed tuck Fantasy […]
Bonnie Cheuvront
Thanks so much for this pattern. It’s so nice to know someone’s designing new work for flat bed knitting machines.
Tina
You are welcome! 🙂